
 THQ says the game will deliver “an uncharacteristically rich storyline for a mobile game and 2 1/2 to 3 hours of gameplay.” Gameplay is not like the full size console versions. Check out Gizmodo for more info on the game.
Wednesday, July 16, 2008
The Force Unleashed for Apple I-Phone
Gizmodo has some great photos of the upcoming Star Wars: The Force Unleashed video game for the Apple iPhone being put together by THQ.
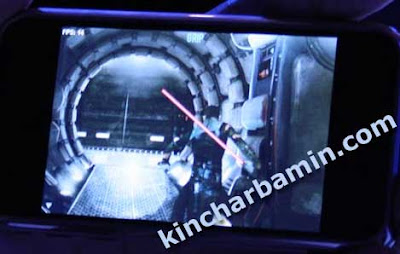 THQ says the game will deliver “an uncharacteristically rich storyline for a mobile game and 2 1/2 to 3 hours of gameplay.” Gameplay is not like the full size console versions. Check out Gizmodo for more info on the game.
THQ says the game will deliver “an uncharacteristically rich storyline for a mobile game and 2 1/2 to 3 hours of gameplay.” Gameplay is not like the full size console versions. Check out Gizmodo for more info on the game.
Tuesday, July 15, 2008
See Star Wars in ASCIImation
Check this out. You old time Computer hacks will love this.

It's Star Wars A New Hope all done is ascii characters. It's great!
Check it out at the Star Wars ASCIIMATION website
Friday, July 11, 2008
New Lightsaber controller for Xbox 360
Motus Games, has been working on something they call Darwin(tm).
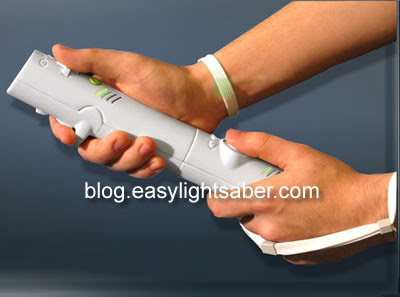
This new wireless controller will offer 6 degrees of movement capture for more realistic response. And it appears to be two controllers in one (it seperates in the middle).
Check out the website for more information.
This new wireless controller will offer 6 degrees of movement capture for more realistic response. And it appears to be two controllers in one (it seperates in the middle).
Check out the website for more information.
Wednesday, July 9, 2008
Force Unleashed Trailer Released
Entertainment Weekly has the been given the OK to show
the new trailer for Star Wars: The Force Unleashed.
This is the Xbox 360 version.
 See it at EW.COM
 Tuesday, July 8, 2008
Rotoscoping a Lightsaber Blade with FXhome EffectsLab Pro
So I finally got a copy of FXhome EffectsLab Pro and I got to tell you, this has got to be one of the easiest and most cost effective ways to rotoscope a Lightsaber blade (and several other effects) in a movie you have made.
After puttering around with it for a little bit I decided it would be fun to rotoscope the same video I had done with Adobe Photoshop and Premiere using FXhome EffectsLab Pro and compare the difference. Unfortunately I didn’t have the original video so it’s a little lower resolution then I would prefer. But for the purpose of this tutorial, it works just fine.
A couple things about FXhome EffectsLab Pro, it is as its name implies a program for adding Effects, visual effects. It doesn’t do audio; it doesn’t do Titles, Subtitles or that kind of stuff. Use Microsoft Movie Maker or some other movie editing software to do that. FXhome EffectsLab Pro is for adding things like Lightsabers, Blasters, Explosions and things like that.
Also as piece of advice, I don’t believe in editing an entire video clip if you only need to apply effects to a section of it so I open my unedited video in Windows Movie Maker, save the project and then use the Split function to cut out just the piece I’m going to edit and save it separately. Now I have a smaller file to work with.
Open FXhome EffectsLab Pro and select the video clip you want to edit.

You’ll see your video clip in the timeline

Advance ahead a frame at a time until you reach the first frame that you want to add the blade. You can either use the left/right keys to move through the movie or you can use the Next field button.
As you can see in the next picture, the Lightsaber blade is just starting to come into view, this is where I will start adding the blade effect.

Click and hold down the right mouse button on the Neon Light effect under the Effects Tab in your Toolbox, now drag the Neon Light effect over onto your video clip you are editing.

Now down on the timeline you will see a layer called Neon Light.
Click on the Crop tool.

Now click on the right end of the Neon Light effect and drag it to the length that you need the effect to last (you can shorten and lengthen it as needed)
Inside that layer you will see a line that says Neon Glow. Single Click on it.

And on the right hand side of the screen, you will see the attributes for that neon glow layer. Here you can change things like the color of the blade or the feathering (fuzziness) of the blade core. This is something you might want to tinker with as it may change with different scenes.
Click on the color bar to change the color.
Then click the Color box to bring up the color palette.
Choose your color and click ok.

Next, back down in the timeline, under the Neon Light layer, click on the line that says Neon Glow and click the little green dot once and turn it red.
This turns the effect of the glow off.
This makes it a lot easier to do the editing; when we are done we will turn it back on.
Next click on the line that says Neon shapes.

Then on the right side of the screen, click on 4-point

We are now ready to start adding the rotoscoped blade effect.
Note: You can use the zoom tool located in the upper right corner above your video to enlarge or shrink down the area you are working in. You can also hold down the right mouse button when you have your mouse over the image to move the screen around.
This is very handy when working on a small area.

Click once next to the hilt of the Lightsaber (where the blade comes out)
Click either on the right side or left side of where the blade is, then click the other side, then go down to the end of the blade, and click the two points of that end.

You must do the handle/hilt end first, then the tip of the blade.
The software needs to know which end is which so it expects you to do it in this order.
You will note that in this frame the end of the blade extends off the edge of the screen.
You don’t need to draw all the way to where the end of the blade would be, but you should go off the screen some to get the glow right.
On the right hand side of the screen you will see the attributes for the effect.
You can curve both ends of the blade by putting a value from -0.50 to 3 in the Hilt curve or Tip curve boxes. A negative value will curve the end inward (you way want this on the hilt sometimes). Use the slider to adjust the curve to your liking. You will most likely change this setting as you go depending on which way your saber is pointing at the time.

Then hit the right arrow key or click the Next field button to go to the next frame.
You will see that the effect you drew from the previous frame is in the same spot, grab the corners and drag the shape to cover the blade again.
Keep repeating the process (saving along the way) until you have every frame done.

Now go back to the timeline and click the red dot next to Neon Glow to turn the glow back on.
![]()
And the effect will appear.

(NOTE:
Real image looks much better, I had to squish this to
make it fit on the screen)
Render your movie, pull it back into Movie maker, add your sound effects and titles and
your done.
Subscribe to:
Posts (Atom)