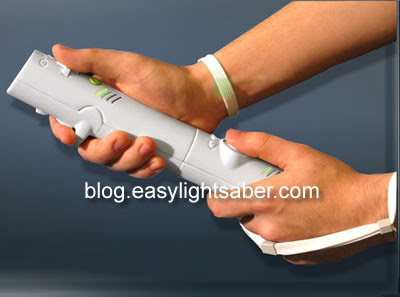
This new wireless controller will offer 6 degrees of movement capture for more realistic response. And it appears to be two controllers in one (it seperates in the middle).
Check out the website for more information.


After puttering around with it for a little bit I decided it would be fun to rotoscope the same video I had done with Adobe Photoshop and Premiere using FXhome EffectsLab Pro and compare the difference. Unfortunately I didn’t have the original video so it’s a little lower resolution then I would prefer. But for the purpose of this tutorial, it works just fine.
A couple things about FXhome EffectsLab Pro, it is as its name implies a program for adding Effects, visual effects. It doesn’t do audio; it doesn’t do Titles, Subtitles or that kind of stuff. Use Microsoft Movie Maker or some other movie editing software to do that. FXhome EffectsLab Pro is for adding things like Lightsabers, Blasters, Explosions and things like that.
Also as piece of advice, I don’t believe in editing an entire video clip if you only need to apply effects to a section of it so I open my unedited video in Windows Movie Maker, save the project and then use the Split function to cut out just the piece I’m going to edit and save it separately. Now I have a smaller file to work with.
Open FXhome EffectsLab Pro and select the video clip you want to edit.

You’ll see your video clip in the timeline

Advance ahead a frame at a time until you reach the first frame that you want to add the blade. You can either use the left/right keys to move through the movie or you can use the Next field button.
As you can see in the next picture, the Lightsaber blade is just starting to come into view, this is where I will start adding the blade effect.

Click and hold down the right mouse button on the Neon Light effect under the Effects Tab in your Toolbox, now drag the Neon Light effect over onto your video clip you are editing.

Now down on the timeline you will see a layer called Neon Light.
Click on the Crop tool.

Now click on the right end of the Neon Light effect and drag it to the length that you need the effect to last (you can shorten and lengthen it as needed)
Inside that layer you will see a line that says Neon Glow. Single Click on it.

And on the right hand side of the screen, you will see the attributes for that neon glow layer. Here you can change things like the color of the blade or the feathering (fuzziness) of the blade core. This is something you might want to tinker with as it may change with different scenes.
Click on the color bar to change the color.
Then click the Color box to bring up the color palette.
Choose your color and click ok.

Next, back down in the timeline, under the Neon Light layer, click on the line that says Neon Glow and click the little green dot once and turn it red.
This turns the effect of the glow off.
This makes it a lot easier to do the editing; when we are done we will turn it back on.
Next click on the line that says Neon shapes.

Then on the right side of the screen, click on 4-point

We are now ready to start adding the rotoscoped blade effect.
Note: You can use the zoom tool located in the upper right corner above your video to enlarge or shrink down the area you are working in. You can also hold down the right mouse button when you have your mouse over the image to move the screen around.
This is very handy when working on a small area.

Click once next to the hilt of the Lightsaber (where the blade comes out)
Click either on the right side or left side of where the blade is, then click the other side, then go down to the end of the blade, and click the two points of that end.

You must do the handle/hilt end first, then the tip of the blade.
The software needs to know which end is which so it expects you to do it in this order.
You will note that in this frame the end of the blade extends off the edge of the screen.
You don’t need to draw all the way to where the end of the blade would be, but you should go off the screen some to get the glow right.
On the right hand side of the screen you will see the attributes for the effect.
You can curve both ends of the blade by putting a value from -0.50 to 3 in the Hilt curve or Tip curve boxes. A negative value will curve the end inward (you way want this on the hilt sometimes). Use the slider to adjust the curve to your liking. You will most likely change this setting as you go depending on which way your saber is pointing at the time.

Then hit the right arrow key or click the Next field button to go to the next frame.
You will see that the effect you drew from the previous frame is in the same spot, grab the corners and drag the shape to cover the blade again.
Keep repeating the process (saving along the way) until you have every frame done.

Now go back to the timeline and click the red dot next to Neon Glow to turn the glow back on.

And the effect will appear.

(NOTE:
Real image looks much better, I had to squish this to
make it fit on the screen)
Render your movie, pull it back into Movie maker, add your sound effects and titles and
your done.


The first step is to load the movie into Premiere and
edit it.
Use the Razor tool to mark segments where you
do and do not see the saber blade in the frame. It is not required
but it makes sense. This way you can edit the individual segments
which load and write much faster in Premiere and Photoshop. Why edit
the entire film when you only need to edit the frames where the
blade is visable.

After you make all the segments, save this
step so you have a master template
Next select the a segment you need to edit (start with
the shortest one for your first try), click on it once to select
it,

and export the segment as a Filmstrip.

Now load Photoshop and open the .flm file you created.
It will look something like this.

Note: The steps from here down to the point of saving
the file back to premiere's .FLM format are the same steps you
would use to edit a still shot of a Lightsaber.
Add a new layer (from the Layers menu, select new and
then layer).
(Special Note: If your
movie has multiple sabers in the same shot you must create a
different layer for each saber color and repeat the process for each
layer)

Enlarge the image so you can see one frame at a time
on your screen.
Now select the lasso tool

and draw a box around the area of the blade.

Now select your fill tool (the paint bucket)
and fill the area with white.

Now repeat the last two steps for every frame in the
strip needs to be done.
(also repeat for each layer if you have
multiple sabers in shot)
This can be a long slow tedious job.
Take your time and take a few breaks if you need to.
You can
save your work as a .PSD file at any time and should just so you
don't spend an hour doing this and your PC hangs up and you loose
everything!!
If you haven't saved
your work, do so at this time before proceeding.
This way, if
after your done you don't like the effect on film, you can come back
to this point and try again.
From the Filters menu, select Blur and Gaussian
Blur.
Now here is where you have to start fooling
around.
Depending on how big the image of the blade is in the
shot will depend on how much blur you really need.
Move the
slider around a little till your image is just a little
fuzzy.
Write down this setting so you know what looks good.

Next from the Layers menu select Effects and Outer
Glow.

Again, this is where you get to play some.
Pick the
color you want your blade to be. If you choose a custom color, write
it down.
I like 100% opacity, 25 pixels of blur and 255%
intensity for this shot, it might be different for you.
Again, it
depends on the size of the blade in the shot, the lighting of the
shot and what have you.
Experiment until you get the effect you
want.

(Special Note: If your
movie has multiple sabers in the same shot you must repeat the
process for each layer)
Save this file (with a new name).
Now from the Layers menu, select Flatten
Image.
Once you have done this, do NOT edit the file
or save it again. When you close Photoshop, it will ask if
you want to save your changes, answer NO.
Once you flatten an
image, you cannot go back and change the glow effect.
Now save the file as a Filmstrip giving it a new name
then what you had exported out of Premiere.
Go back to Premiere, load this Filmstrip and edit
it.
Select the segment that you originally exported and delete
it.
Now replace it with the edited version (the .FLM
file)

Save the project and repeat until you have all your
new segments in the movie.
Export the movie out and watch your
Lightsaber glow!
See More Lightsaber Stuff at
http://www.kincharbamin.com

Let's start with the Parts. On the left we have three rubber seals that go on a garbage disposal where the drain pipe connects to it (you can uuse O-rings too). Up top we have some rubber floormat that has been cut to be about an inch wide. Next to it is a flashlight lens that was painted silver.
Then we have the three pieces of 1 1/2 inch plumbing pipe. The one to the left is 6 inches long, has threaded ring that screws on top and is sleeved to allow another pipe to fit into it. This will be the emitter end and the flashlight lens will go under the ring. At the bottom is a 5 inch piece that is just plain at both ends. Lastly is the 45 degree angled piece and the two screw on rings with seals.
What I'm building here is a Count Dooku style Lightsaber.
If you want to build a straight lightsaber, just take out the 45 degree angle and use a straight connector or one longer sleeved piece.
The one piece I forgot to show here is the endcap for the grip end, but you'll see it in a minute.
 Step 1)
Put the one ring and seal around the end to be the "Emitter" and Slip the "Emitter" piece into the 45 degree. Slide the ring down and thread on.

Step 2)
Repeat the process for the grip end.
 Step 3)
Slip the rubber seals onto the grip end and space them evenly. Use more seals if you want a full grip of rubber.

Step 4)
This is the piece I forgot to show you earlier. It's 1 1/2 inch plug for a sink top (or whatever) and it makes a perfect endcap.

Ok, we have the rear grips in place and the end cap in. Now we need a fore-grip. Something to hold onto as you're doing battle.
I forgot to take a picture but, now is a good time to unscrew the "Emitter" ring and put the flashlight lens under it, then screw it back on. If you can't find a flashlight lens to use. Just cut a piece of cardboard or some plastic and paint it silver.

Step 5)
Cut a piece of the rubber floor mat long enough to fit around the saber. This takes a little practice. I have found that it's just easier to cut it too long, then start trimming until I can just wrap it around where it's going to go and the ends match up nicely. Take your time and cut straight. You want the ends to match up good or it will really look bad.
 Step 6)
CAREFULLY apply some super glue to the back of the rubber. Make sure you get the two ends that will butt up together as well.
Don't apply too much or it will seep out the sides and fog up the chrome. If you get to much on the rubber, careful wipe some off with a paper towel.
 Step 7.
Now CAREFULLY wrap the rubber strip around the emitter end. And use some tape to hold it in place till it dries.


Now go out there and use this guide and start making your Lightsaber.
After you build one or two, you will start thinking of all sorts of things that you can use.
For More Useful Lightsaber Tips Go To My Full Site
http://www.kincharbamin.com
